Menu

weblogic etiketine sahip kayıtlar gösteriliyor. Tüm kayıtları göster

28 Aralık 2013 Cumartesi

Error Starting Weblogic Admin Server: Could not reserve enough space for object heap

The first time that I run my weblogic admin server after installing and configuring oracle soa in weblogic 10.3.x, I encountered the following error:
Could not reserve enough space for object heap.
Could not create the Java virtual machine.


I resolved this by creating a new environment variable called EXTRA_JAVA_PROPERTIES with the following value "-Xms512m -Xmx512m". 


Running applications with limited free memory (7343786)

Under certain circumstances, if you do not have enough free memory available, you may receive an error when running an application:

Error occurred during initialization of VM
Could not reserve enough space for object heap

Normally you would resolve this by adding -Xms and -Xmx arguments to the project's Run/Debug profile. However, there are existing entries for these settings in the WebLogic startup that will override the project's settings. The proper way to resolve this error is to add EXTRA_JAVA_PROPERTIES to your environment, as follows:

On Linux
setenv EXTRA_JAVA_PROPERTIES "-Xms512m -Xmx512m"

On Windows
set EXTRA_JAVA_PROPERTIES="-Xms512m -Xmx512m"

Important update to this post!

"-Xmx512" is not sufficient to run and test an application in a SOA server, because it would be incredibly slow. If you encounter the above issue using the default config of "-Xmx1024m", then try to decrease the number until it will work. There is no hard rule, you could try "-Xmx1000m" for instance. If it still doesn't work, then try decreasing the number again.


18 Mart 2013 Pazartesi

Weblogic ile authentication ve authorization

        Merhaba bu yazimizda, weblogic server uzerinde olusturdugumuz kullanicilara yetki nasil verebiliriz ve uygulama bolumde nasil kullanabiliriz bunu paylasacam. Yine diger makalelerimde oldugu gibi, ekran goruntuleri ile birlikte verecegim daha anlasilir olmasi acisindan. Simdiden herkese faydali olmasi dilegiyle. 

Ve baslayalim :)

1. Weblogic Admin Konsola login oluyoruz

2. Security Realms linkini seciyoruz.

3. myrealm`i linkini secerek devam ediyoruz.

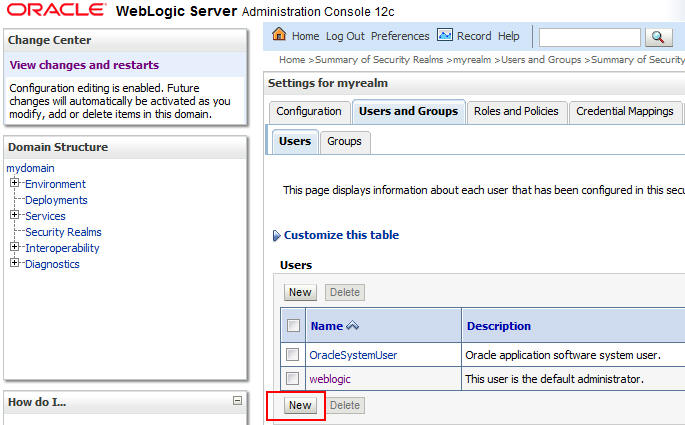
4. User and Groups tabinda New diyerek yeni bir kullanici olusturalim

5. ertugrul isminde bir kullanici eklerek devam ediyorum

6. Yeni bir kullanici daha ekleyelim

7.Ok

8. Welogic kismindaki yapilacaklari bitirdik simdi uygulama tarafina geciyoruz. Bir Jsf uygulamasi olacak

9. Ve asagidaki adimlari takip edelim.

10.

11.

12. uygulamamizin web.xml icerisine asagidaki bolumu ekliyoruz.


13. weblogic.xml icerside asagidaki gibi olacak


14.login.xhtml olusturuyoruz.


15. login.xhtml icerisi


16. LoginBean.java classimizi olusturuyoruz.


17. LoginBean.java classi ici

18.index.xhtml

19. Uygulamamizi weblogic server`a deploy ettikden sonra index sayfasina gitmek istesek bile bizi login sayfasina yonlendirecektir.


20.

Uygulamanin kodlari : 

17 Mart 2013 Pazar

Weblogic JMS uygulamasi

Merhaba, bu yazimda weblogic uzerinde bir Java Message Service (JMS) uygulamasini nasil yapabiliriz, ilk bastan en sona ekran goruntuleri ile birlikte paylasacagim. Bu uygulamayi yaparken 30`un uzerinde ekran goruntusu ortaya :) cikti. Faydali olmasi dilegiyle.

1. Weblogic Admin Console`u actikdan sonra
 Summary of Deployments >Summary of Services: JMS >Summary of JMS Servers altinda

2. DenemJMS adinda bir JMS Server olusturuyoruz.

3. Olusturdugumuz JMS Server`i bir managed server`a atiyoruz. (Clusterada atabilirsiniz)

4. asagidakileri uyguluyoruz.

5. JMS modules ekliyoruz.

6. New diyerek ekliyoruz


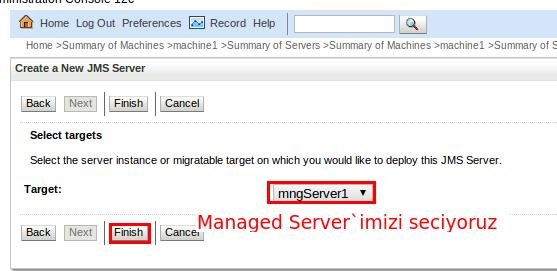
7. Managed Server`imizi seciyoruz

8. Finish diyerek bitirelim

9. Herseyin basarili oldugu goruluyor. ve herhangi bir restarta ihtiyac yoktur.

10. dosya ismini ne verdigi gorebiliyoruz.


11. SImdi bir Queue olusturuyoruz.


12. JNDI ismini verip next diyoruz.

13. Subdeployment secerek devam ediyoruz.

14. Ok

15. Finish

16.

17.

18. Simdi ise JMS server`a connection kurabilmek icin ConnectionFactory olusturuyoruz.

19. Asagidaki olusturarak devam ediyoruz.

20. Server`a secerek devam diyoruz.

21. ConnectionFactory ve Queue`muz gorunuyor.

22. Simdi ise Netbeans`de bir EJB module olusturup MDB bean`imiz olusturuyoruz.

23. Next

24. Next

25. Weblogic Server`a secerek devam ediyoruz.

26. Message-Driven Bean`imizi olusturuyoruz.

MDBExample.java
package tr.com.devinim.example;
import javax.ejb.ActivationConfigProperty;import javax.ejb.MessageDriven;import javax.jms.JMSException;import javax.jms.Message;import javax.jms.MessageListener;import javax.jms.TextMessage;
/** * * @author easlan */@MessageDriven(mappedName = "jms/myQueue", activationConfig = {    @ActivationConfigProperty(propertyName = "acknowledgeMode", propertyValue = "Auto-acknowledge"),    @ActivationConfigProperty(propertyName = "destinationType", propertyValue = "javax.jms.Queue")})public class MDBExample implements MessageListener {        public MDBExample() {    }        @Override    public void onMessage(Message message) {        try {            TextMessage tm = (TextMessage) message;            System.out.println("Geriye donen mesaj: " + tm.getText());        } catch (JMSException jex) {            System.out.println("Exception: " + jex);        }    }}


27. Simdi ise Olusturdugumuz MDB`mizi cagiracak JSF projemizi olusturuyoruz.

28. Next

29. Weblogic Server`imizi seciyoruz.

30. Java Server Faces Frameworkumuzu secip devam ediyoruz.
MessageYayinlayiciBean.java

package tr.com.devinim.jsf;
/** * * @author easlan */import javax.annotation.Resource;import javax.enterprise.context.RequestScoped;import javax.faces.application.FacesMessage;import javax.faces.context.FacesContext;import javax.inject.Named;import javax.jms.*;
@Named(value = "mesajBean")@RequestScopedpublic class MessageYayinlayiciBean {
    @Resource(mappedName = "jms/myQueue")    private Queue myQueue;    @Resource(mappedName = "jms/myQueueFactory")    private ConnectionFactory myQueueFactory;    private String mesaj;
    public MessageYayinlayiciBean() {    }
    public String getMesaj() {        return mesaj;    }
    public void setMesaj(String mesaj) {        this.mesaj = mesaj;    }
    public void mesajGonder() {        FacesContext facesContext = FacesContext.getCurrentInstance();        try {            sendJMSMessageToMyQueue(mesaj);            FacesMessage facesMessage = new FacesMessage("Mesaj gonder: " + mesaj);            facesMessage.setSeverity(FacesMessage.SEVERITY_INFO);            facesContext.addMessage(null, facesMessage);        } catch (JMSException jmse) {            FacesMessage facesMessage = new FacesMessage("Mesaj gonderilemedi: " + mesaj);            facesMessage.setSeverity(FacesMessage.SEVERITY_ERROR);            facesContext.addMessage(null, facesMessage);        }    }
    private Message createJMSMessageForjmsMyQueue(Session session, Object messageData) throws JMSException {        TextMessage tm = session.createTextMessage();        tm.setText(messageData.toString());        return tm;    }
    private void sendJMSMessageToMyQueue(Object messageData) throws JMSException {        Connection connection = null;        Session session = null;        try {            connection = myQueueFactory.createConnection();            session = connection.createSession(false, Session.AUTO_ACKNOWLEDGE);            MessageProducer messageProducer = session.createProducer(myQueue);            messageProducer.send(createJMSMessageForjmsMyQueue(session, messageData));        } finally {            if (session != null) {                try {                    session.close();                } catch (JMSException e) {                    e.printStackTrace();                }            }            if (connection != null) {                connection.close();            }        }    }}

index.html


Ve son olarak. Once EJB`mizi (MDB) daha sonrada JSF uygulamamizi weblogic server`a deploy ederek bitirelim ve test edelim.


JSf uygulamamizda deniyoruz.

Asagida ise managed serverimizin logu

Umarim faydali bir makale olmustur.